For whatever reason, there seems to be a serious dearth of information regarding lens modification on the C-mount Computar 12.5mm f/1.3 lens. I am going to share my experience modifying this lens, in the hope that it will prevent other people from having the same issues which I have encountered.

DIY $7 Film Slate
I can’t claim credit for this one – my extremely talented and resourceful production designer got the idea to use an inexpensive slate “prop” and modify it slightly to allow the use of erasable whiteboard markers. These are usually a bit more than seven dollars, and we didn’t have the time to wait for one to arrive in the mail for the shoot in question.
There are only two pieces of “hardware” which are required to make this, along with a few pieces of duct tape, a sharpie, a ruler, and whatever whiteboard markers and erasers you are planning to use on the finished slate.
You will need to buy these two items from a Five Below discount shop:
- Slate Prop - $5
- 8.5 x 11 Eraseable Whiteboard - $2
Apologies for not giving a product link for the slate prop – I had trouble finding it on the Five Below site. I assure you, it does exist…
Assembly Instructions
-
Break the frame of the whiteboard, and remove the cardboard backing and the broken frame. You should now have a piece of unencumbered whiteboard.
-
Position the whiteboard over the slate prop’s useless slate writing. You can’t write on the slate with chalk, so it is pretty useless as-is. Center it as best you can, then use strips of duct or gaff tape to attach the whiteboard surface to the clapper.
-
Use the ruler as a straight-edge to draw sharpie lines to denote the different markable areas on your slate. In the best penmanship you can muster, label them with the sharpie.
It is a pretty simple hack, but quite effective for giving your editor a bit of A/V sync assistance.

Boom!
There are quite a few guides, tutorials, videos, and other resources on how to capture usable boom audio. Most of these have a few usable sections with a bunch of fluff or useless information accompanying them. This is my attempt to compile a “quick guide” to capturing usable boom audio, assuming you don’t have a competent audio engineer in your employ (which I highly recommend). Audio is half of your deliverable product, as a cinematographer, so you should make sure that you capture the highest quality audio possible.
Proximity, Reflections, and the Inverse Square Law
Much like light, sound decreases exponentially as you move away from the source of the sound. One of the first things which you will realize when starting to capture audio is that it sounds increasingly awful as you move further away – which can be attributed to two things:
-
As you move further away, relative volume decreases. The background sounds (“noise floor”, for anyone trying to be technical), consisting of both the present background noises and any noises introduced in the recording process, increase when you increase the sensitivity of your recording equipment. As the source sound becomes quieter, bringing sound up in post production will also increase that noise. (If anyone says “just record some room tone”, ignore them; it won’t help you if your source recording is terrible, since that’s only a solution if you can gate and isolate the primary sounds in post.) This is one of the compelling reasons why boom operators are utilized; they allow a recording to be made from closer to the source.
-
Reflections. Light bounces off of everything, as we are taught, and we have to be careful to deal with those reflections, in terms of color, brightness, et cetera. Sound does the same thing. It bounces off of surfaces, but because sound travels slower than light, we notice when it takes a few milliseconds longer for sound to arrive at our recording device. Even more insidious, those reflections (which take on different properties and sounds based on the materials on which they are reflecting) can sound louder than the original sound – which will make your recording sound terrible. The closer you are in proximity to the source, the softer the reflections will be, in comparison to the original sound.
Polar/Pickup Patterns
Not all microphones, or even microphone types are created equal. They all have different “polar patterns” which describe the areas of sensitivity which the microphones use to pick up sound. When attempting to capture dialog, for example, an omnidirectional microphone would be a poor choice, as it picks up sound equally from all directions, taking away the ability to create greater isolation for the primary sound source. The most popular boom microphone type is the “shotgun” microphone, which has a very directed polar pattern, allowing specific isolation of the sound in question.
Levels, Peaking, and Limiting
Getting the recording level just right is one of the more tricky parts of recording external boom audio. If the audio is too high, “peaking” will occur. Peaking is the phenomenon which can be heard when the top part of a sinusoidal wave (which naturally recorded sounds have) becomes squared when the top of the wave is clipped by hitting the top limit for recording signal. If the audio is too low, the signal-to-noise ratio will be too low, and bringing the signal up to a usable level will bring the sound floor up to an obscenely loud level – making gating nearly impossible to perform.
To properly deal with this, you need to adjust the signal level so that the loudest sound comes in under 0 dB, which is where most recorders “peak”. If certain sounds surpass 0 dB, some audio recorders have the ability to apply a “limiter” effect, which will push the sound level back down to a usable value as it is recorded. It’s not a desired effect, but it can save you from clipping.
As you’re adjusting audio levels, you’ll see a constantly fluctuating level of audio when no primary sound source is active. This is the “sound floor”, and should be as far away from the bulk of the primary sound levels as possible.
Portable Recording Devices
I recommend avoiding the Tascam DR-40 unit unless you’re positive that you are using a balanced microphone. It tends to have a weird firmware issue which produces a strange clicking sound (almost impossible to remove) every quarter of a second when presented with an unbalanced microphone. If you’re worried about this, go for the Zoom H4n. It’s a bit more expensive, but it seems to handle less expensive microphones in a more able fashion, as well as having signal limiting and a host of other interesting features.
Compression and Formats
Most digital recorder units will record, at a minimum MP3 and WAV formats. WAV is an uncompressed audio format, which means that it takes up more storage space than a compressed format, but retains all of the information captured (at the resolution captured). MP3 is a compressed format, using a psycho-acoustic model, which means that it drops pieces of information which it figures we aren’t going to be able to hear. MP3 files take up a smaller amount of space compared to the same resolution WAV files – but that comes at the cost of throwing some of the information out. MP3 @ 192kbps or above tends to have enough information for most uses.
Equipment
There’s no “correct” equipment which you need to purchase to be able to capture boom audio properly. There are, however, a few piece of equipment you’re probably going to need.
- Extendable Boom Pole. It’s tempting to go with a converted painters’ pole, but trust me – it pays to go with a decent boom pole. This is mainly due to the additional noises which can be generated by swinging around a makeshift boom pole. I personally recommend the On Stage MBP7000 boom pole for budget operators. It doesn’t have an internal mic cable, but it works very well.
- Microphone Cable (XLR). This is an easy place to skimp for some people, but you don’t want to pick up outside noise, so make sure you go with a shielded XLR cable which is a few feet longer than the maximum size of your boom pole, fully extended.
- Clip / Shockmount / Zeppelin / Windscreen. You need something to isolate the microphone from the wind, vibration, and other distorting effects of the environment, which would distract from otherwise relatively clean audio. Shockmounts can be had for relatively little, as can windscreens. A zeppelin can cost a bundle, unless you make a DIY one – but they produce very clean-sounding results.
- Wire clips / wraps. Either some electrical tape (a cinematographer’s best friend, after gaffe tape), or some inexpensive bobble hair ties (available at most dollar stores) will allow you to keep the XLR cable near the pole – otherwise you may find it dropping into frame at the most inopportune times.
- Microphone. There is a great deal of conjecture over the “best” budget microphone to use. The most important things to consider are the polar pickup pattern, the signal-to-noise ratio, and the frequency response of any microphone you’re testing.
- Portable digital recorder. Covered in the portable recorder section.
- Headphones. A set of headphones, preferably full cup earphones, are essential to monitoring the sound for disturbances and/or interruptions. My favorite pair is the Sennheiser HD-280 PRO, as they’re relatively inexpensive (under 100 USD), and produce a fairly accurate reproduction of live audio.
- Storage media. Make sure you don’t buy off-brand media cards. Try to stick with SanDisk and Lexar media, if you can. The trick is that these companies generally tend to QA their products a bit more rigorously than most off-brand manufacturers. This can make the difference between usable audio and a very upset director.
Technique and Directionality
Rather than iterate all of the techniques involved in actually operating a boom mic rig, and keeping in mind that pictures are worth a thousand words…
Conclusion
Audio is half of your deliverables – so make sure your boom operator knows how to deliver the best possible audio to your audio engineer for post production. Good luck!
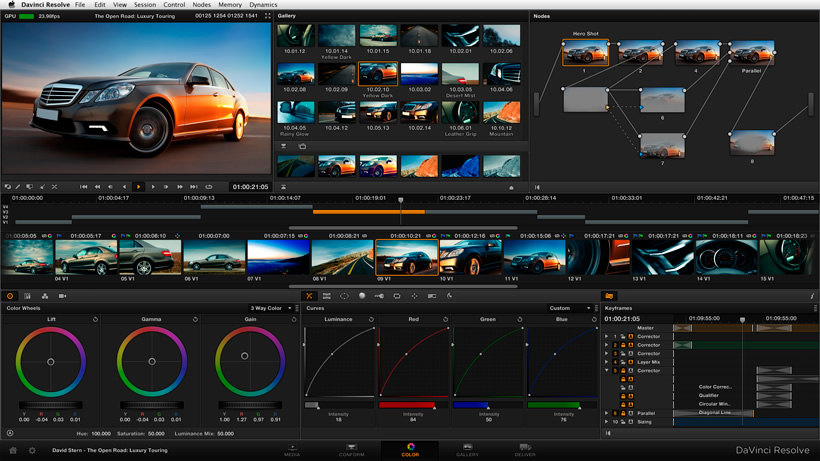
BMPC4K Workflow With Premiere and Resolve
There are a number of “accepted” workflows for going between Adobe Premiere (as an NLE) and Davinci Resolve (for color correction/grading) for BMPC4K footage. I am going to detail the workflow I have been using, which should be useful both for the BMPC4K camera, as well as the BMPCC and BMCC cameras.
-
Preparation. Make sure your camera is producing footage at the 23.98 fps frame rate, rather than 24 fps. “True” 24 fps is not quite the same thing as the “24P” frame rate we are used to.
-
Load your media onto your workstation.
-
Create simple proxies. Using prores-proxies, create “cheap” lower quality proxies encoded using the H.264 codec in Quicktime files. I have been experimenting with using the “.mpg” extension to force Premiere to use its own internal Quicktime decoder, rather than the relatively dodgy external one, but the basic process is the same.
-
Edit. Using the proxy files, edit your footage in Premiere. You do not have to bother with any fancy transitions or effects yet – just perform a basic edit.
-
Export to Resolve. Export a “Final Cut Pro XML” file, using the File > Export menu option.
-
Create a new Resolve Project. Open Resolve, and create a new project. Import the original files (not the proxies) into your media pool.
-
Import the XML from Premiere. Import the “Final Cut Pro XML” export, with “Automatically import source clips into pool” deselected. This last part is very important, as it forces Resolve to use the clips you already have in the Media Pool.
-
Color Grade. Perform your color grade in Resolve.
-
Export. In the “Delivery” tab, select the whole timeline, choose “Easy Setup”,and select “Final Cut Pro XML Round-Trip”. Change any options here to your liking.
-
Import Roundtrip XML in Premiere. Import the Round-Trip XML file in Premiere. This will bring in all of the graded footage.
-
Perform the remainder of your edits. Tweak your footage, copy or create your title cards, etc.
This is a very basic overview of my current BMPC4K + Resolve + Premiere workflow right now, and it may change.
48 Hours With the Blackmagic Production Camera 4K
This year, my team (Shoot the Moon Films), entered the 2014 Boston 48 Hour Film Festival for the first time. It’s an interesting experience, going from genre and parameters to fully formed script, to planning and preproduction, to shooting and execution, to editing, scoring, grading, and full post-production in a single weekend. I’ve learned a lot about working with the BMPC4K camera in that time. I am going to iterate over some of the more important things that I learned over the weekend.
Overheating
This simply did not happen. I had heard some horror stories about the camera body breaking or overheating after long periods of filming, but even in direct sunlight for significant periods of time, I did not find this to be the case. My EOS body used to overheat more than this one…
ND filters
My Tiffen 77VND was indispensible. If I didn’t have that single piece of equipment, every exterior shot would have been very, very different. I wanted a medium DOF and a standard shutter rate for my exterior shots – which meant that the sunlight had to be stopped down. The variable ND filter delivered perfectly.
EVF
The Cineroid was a life-saver. I do not think I would have done as well without its superior focus-peaking, crop indications, etc. The only feature sorely missing from the EVF4CSS is waveforms/scopes, which would have been a bit more useful than eyeballing the full extent of the dynamic range.
V-mount batteries
If you are not turning your camera off between takes, you are going to need more than one battery for a day-long shoot. Do NOT skimp on a V-mount battery charger. They take a very long time to trickle charge, so make sure you have a rapid charger. Also, spares. They may be expensive, but having to wait on a battery charging could blow a shoot.
Audio
This is less a “thing” with the BMPC4K body, and more of a general observation. You cannot skimp on sound. You just can’t. You can always rely entirely on tight OTS shots and other closeups and use on-camera mics, but it shuts off an entire avenue of creative wider shots. A boom operator is not just your buddy holding a mic on a pole – they need to know what they are doing, otherwise you could be pushing very substandard audio into post-production. Especially on a tight time limit, this can make the difference between making a deadline, or having truly horrendous sound.
Also, get a really competent audio engineer. Preferably a really anal-retentive one with an insane attention to detail. Even if you have perfect video, really crappy audio can break the illusion of your film. DO NOT SKIMP. SERIOUSLY.
That PA or AD – you need them more than you think
If someone is not taking copious shot notes, you are going to find yourself up at some ungodly hour, digging through footage for that shot that you know you got. Save yourself the trouble, and have someone taking care of all of that.
Proxy files
I used a new method of creating intermediate proxy files for editing, since Premiere was not very cooperative in directly loading the Prores files from the camera. I made my code public in a project called prores-proxies. This little trick made sure that, instead of having to render all of my footage out at the Davinci Resolve speed of 3-6 fps (on my non-Red-Rocket workstation), I was able to render it to proxies at about full speed (which was about 24fps). Without this, I wouldn’t have been able to edit the footage without several footage drops during the day – if at all – during the limited timeframe I had to do so.
Premiere Quicktime support on Windows is dog food
Something is wrong with it. I have no idea why, but the QT decoder decided to “give up the ghost” quite a few times during editing. There is supposedly a renaming hack, which allows the Premiere internal decoder to handle the files, but I was not privvy to this information during editing. I will update my documentation and/or author a post on this at some point in the near future, as it is VERY irritating.
Too many cooks
One person edits. Someone can assist them, but you need to have one editor, who makes the decisions as to what goes into your final product. If you try to “edit by committee”, you may end up with a very tired and frustrated primary editor, and the possibility of some very incomprehensible footage.
If your editor and director are not the same person, the director sits in with the editor to make decisions, where they need to be made. Ideally the script notes, etc, provide enough information to the editor to perform his job.
Also, do not get caught up in reviewing dailies if you are taking part in a time-sensitive competition. This is a recipe for disaster.
Coloring
Even shooting with 10-bit ProRes 422 HQ, the advantage over H.264 DSLR footage is immediately apparent. There is a lot of latitude for coloring and correction, which would simply not be possible with the same level of output quality with H.264.
I ended up performing a manual grading (as in, no LUTs or presets) for the project we did, and I am very satisfied with the end result.
Grain
I love the “film grain” that the sensor on this camera produces. I am sure that I have mentioned it in earlier posts, but it really does give that organic film look to your output.
Do not use services like Google Drive for your deliverables
They tend to like to really hurt you in upstream speeds – only when you are on serious deadline. A better alternative for large media files is to set up btsync on both sides, and transfer with far more efficiency. You will be glad that you did it.
Too many hats … sink ships?
There is serious temptation to wear more than one hat. Hell, we all wear more than one hat on most small sets. The issue comes when you end up wearing three or four (director, cinematographer, editor, colorist), and realize that you do not get to sleep until everything is “out the door”. Delegate. Find people who are good at this stuff, and let them do it. You do not have to be good at everything, just find people who are.
Conclusion
I had a good time – but I could have been less stressed out, if I had known some of this in advance.
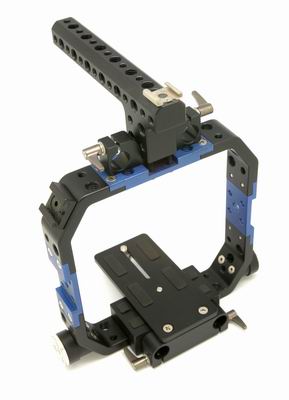
CAME-06 Blackmagic Cage Review
As part of setting up the Blackmagic Production Camera 4K, I have been trying to put together a solid, fairly low-cost set of accessories for the camera body.
I became aware of a low-cost Chinese cage for the BMCC/BMPC4K bodies manufactured by an outfit called “Xiamen Came Photographic Equipment Co., Ltd.”, which are available sporting both top and bottom 15mm rail mounts, along with the normal mounting options and handles present with most cage designs. The cage in question is available for $198, shipping included, from the manufacturer.
My unit arrived today, via DHL, in a box which seemed almost Ikea-esque in its packing. First thing to note, which is not indicated either on the website or the packaging: “some assembly required”. Secondly – no instructions. Thankfully, the entire assembly procedure seemed pretty obvious with the provided Allen wrenches. I noticed that there is a 5/8” mount on the bottom of the unit (as well as a 1/4”-20 mount) for attaching to the fluid head or quick-release plate of your choosing. This wasn’t indicated on the website, but I had my suspicions, which were thankfully confirmed.
The first major issue I encountered was the lack of four of the required screws for assembly. Undaunted, I took a quick trip to the nearest “home improvement” store, and purchased four M4-.70 x 12 bolts with phillips heads (in packs of two), which worked like a charm.
The second slightly annoying issue was that one of the included 30cm 15mm rods was completely unthreaded, so it wouldn’t be possible to attach it to any other rods, should it need to be extended. The inclusion of the rods was a bit of a plus, so I can’t really be too upset about that.
The build quality, once assembled, is quite good. The CAME-06 cage is machined properly, and does not interfere with the operation of the BMPC4K unit at all, and has enough mount points to allow me to put handles, arms, and other accessories on it, which was the secondary purpose of purchasing the cage, after being able to properly mount the camera on a decent QR plate.
Additionally, it has a set of Hirth joints on either side, ostensibly for attaching handle mounts. I have no use for them at the moment, but they seem to be workable.
As the next step up in price is another 70$, and this unit arrived from China in less than four business days from my initial order, the annoyance of a $1.00 bolt purchase seems miniscule, considering the usability of the cage itself. It isn’t a full system, like the Tilta, Lanparte, and others, but can be built into a system incrementally.
Verdict: Know what you’re getting yourself into. If you want a pre-assembled unit, next day shipping, and would rather pay more money for the lack of inconvenience, you should avoid the CAME-06. It’s a good deal for the price, however.
Good luck!
Postscript: The manufacturer offered to reimburse me for the missing screws within a day of me writing to them, so they do seem to be relatively responsive whenever there is a mixup.

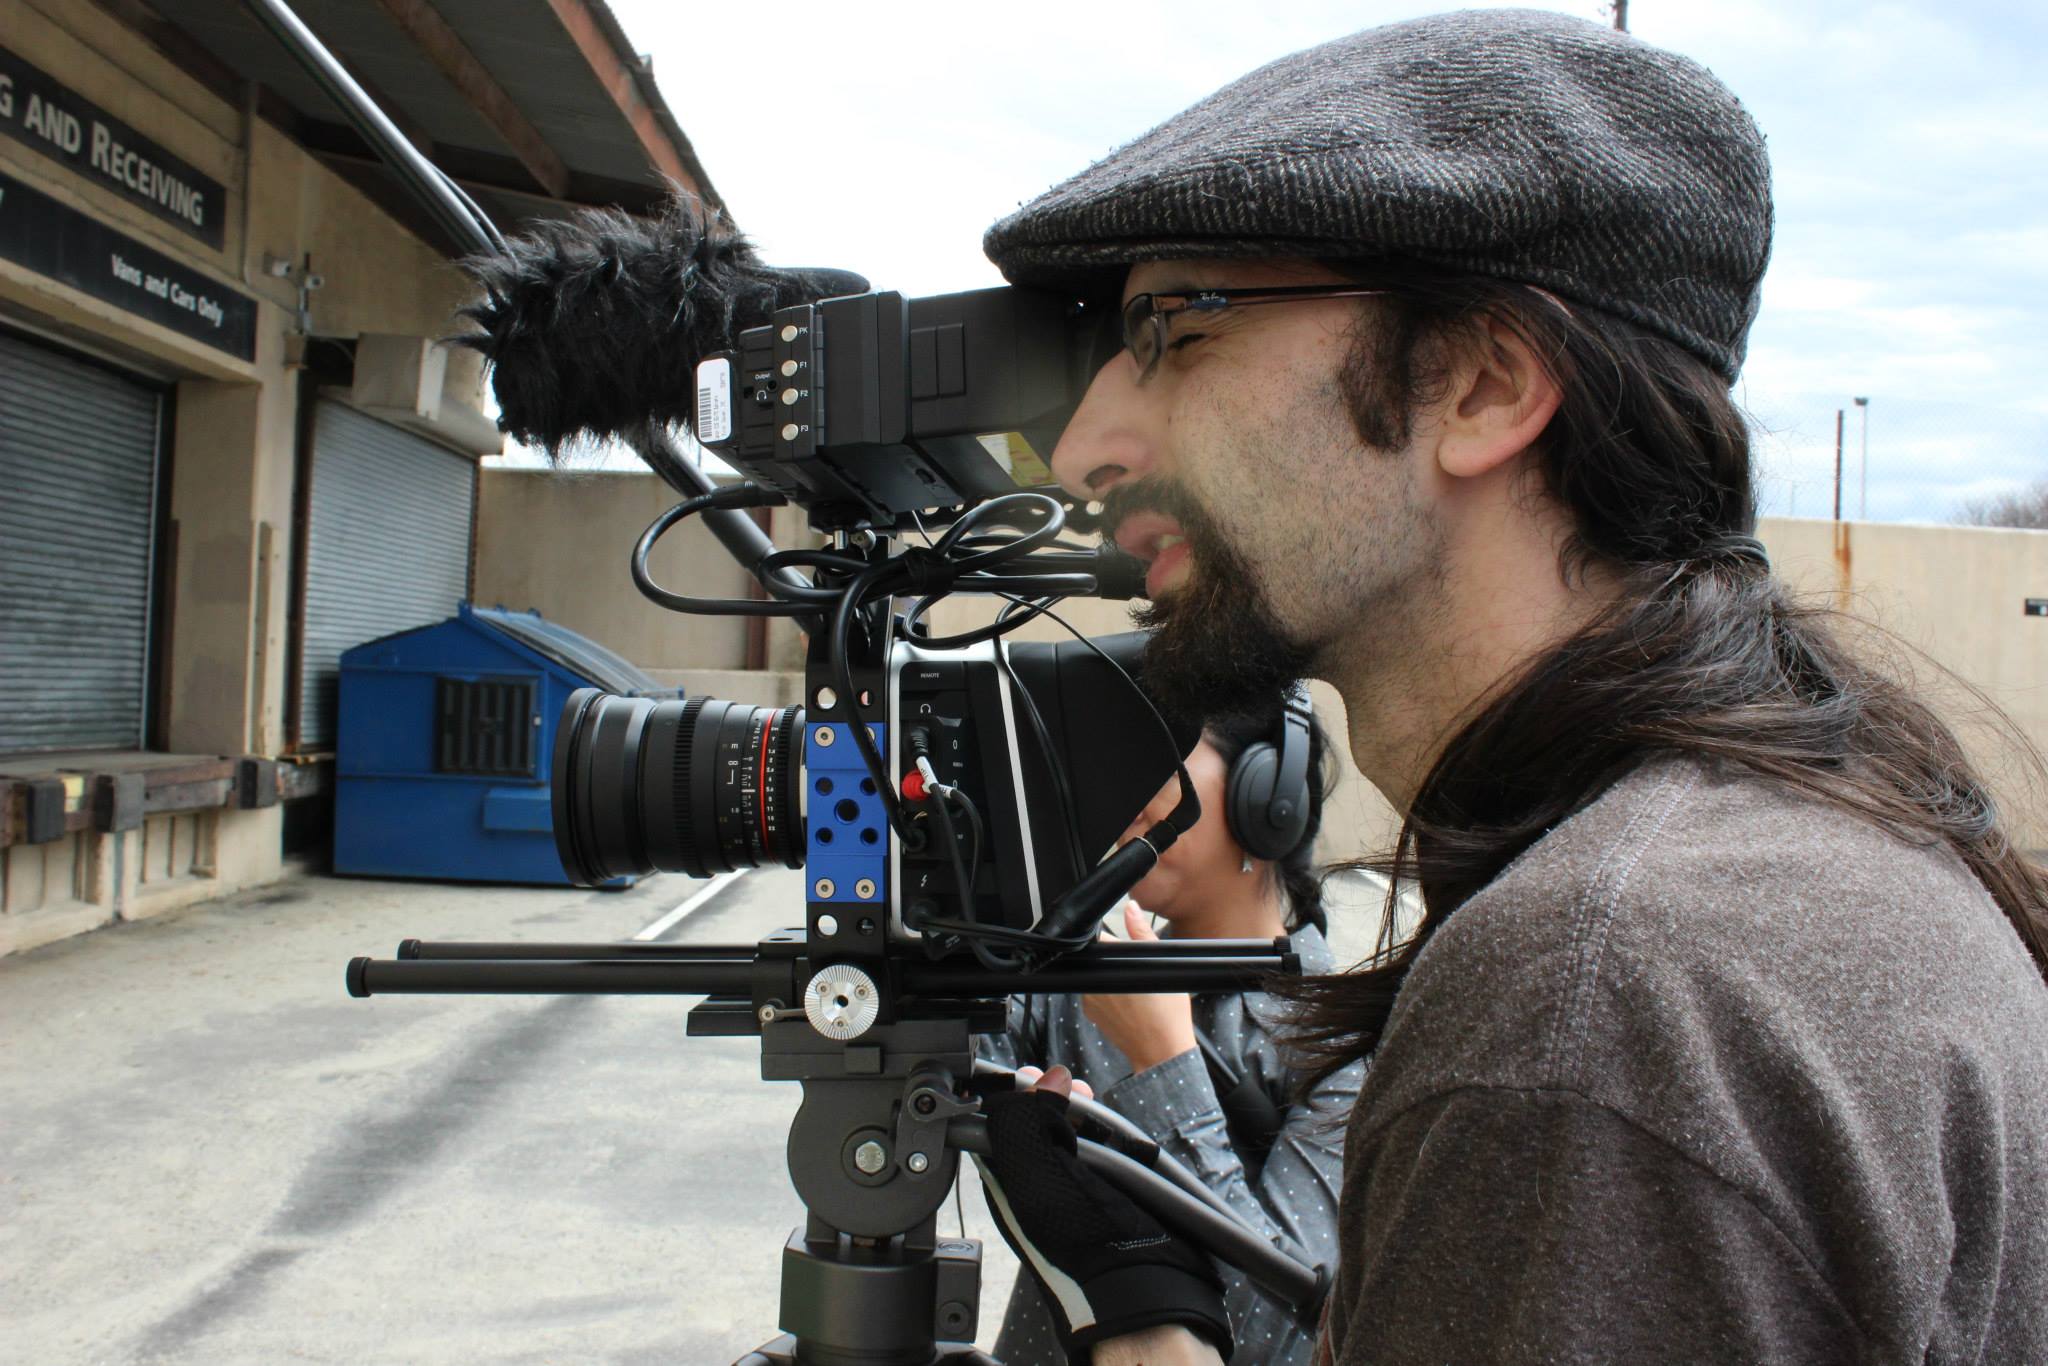
First Look at the Blackmagic Production Camera 4K
I was lucky enough to be one of the early people on the waiting list for Blackmagic Design’s new 4K “Production Camera” body, which I received last week. It boasts a global shutter, Ultra 4K resolution, ProRes/RAW recording at 1080p/4K resolutions, a super 35mm sensor, EF mount, and around 12 stops of dynamic range – among other features. I took it out for a test spin with a fellow cinematographer, just to see how far I could push the image.
After a test run of “horror” shots with both a Canon EF IS lens and a manual Rokinon Cine lens, I’ve been learning about the benefits and caveats of the BMPC body. I’m going to enumerate some of those here.
Benefits
Dynamic Range. This cooks the hell out of the H.264 image that I’ve been getting out of the 5D mark III. I can see a full gamut of sky color without losing my subjects – and that’s without additional or reflected light.
Cinematic Quality. This might have something to do with the depth of the image, or the amazing amount of data that the body is storing for each frame, but it is definitely capable of breathtaking quality. I haven’t seen any artifacts from the footage I’ve taken so far, at either HD or 4K resolution.
Metadata. The touch screen allows some metadata to be stored for each clip, including the name of the project, scene number, etc, and allows it to be edited on the camera body afterwards. It also has a numeric unique numbering system, with customizable body IDs, which beats the MVI_xxxx.MOV or MM1Axxxx.MOV scheme from Canon.
Resolve. The body comes with a full copy of DaVinci Resolve 10. The only way to truly appreciate it is to actually use it. It essentially puts Fast Color Corrector and Colorista to shame. The only downside is that it does take quite a bit longer to run than most of the plugin-based correction and grading tools, unless you’re willing to invest in either a Red Rocket card or a bunch of fairly powerful GPU units for your machine. Either way, it is well worth the time and effort to learn how to use it.
Baked in Zebras and Focus Peaking. This is less of a revelation for me, coming from using Magic Lantern, but users of stock Canon bodies don’t know what they’re missing. You can also acquire these via EVF features – but it can’t be a bad thing to have those features in the body, as well.
Crop Factor. It’s about the same crop factor as an APS-C crop, for you 7D and Rebel users, so it’s only a big deal to acclimate if you’re coming from a full-frame body, like the 5D or 6D. The upshot is that you’re not going to have to blow a lot of money on extremely wide glass, as would be required by the BMPCC.
Global Shutter. If you have a lot of fast motion or quick pans, the lack of the “jello” effect from rolling shutter is very, very noticeable. This is one of the prime reasons I purchased this body – and it works as well as promised.
RAW and ProRes. (Yes, I know “RAW” isn’t an acronym – I just like it enough to shout it…) No firmware hacks, no playing around, you get ProRes and RAW footage out of this camera body. As of the time of writing, RAW has been disabled in the firmware, but I’m expecting an update “any day now” which will re-enable it. This makes me think twice about having usde H.264 as a codec for so long. And the logarithmic data collection means that all of that nice dynamic range is intact through the coloring process, so you’re not losing out there.
EF Mount. This is a big deal for me, as it keeps me from having to rebuy all of my glass. All of my M42, EF, and Nikon mount glass will be fine with this. And as an added bonus, the FD mount glass I have (using the Lens Doctor EF-FD mount adapter) works fine, and without the vignette I have on the full-frame sensor.
Caveats
Mounting. The standard 1/4” mount on the bottom of the camera is more or less useless; the mount plates either shift or scratch the bottom of the camera – so I ended up using the aluminum handles for my tests. They’re not particularly useful, considering the weighting of the camera, so I’m waiting for a cage to arrive. I only considered cages with upper and lower 15mm rod mounts (for options, of course). These are the ones I found to be the best choices:
- CAME-06 BMCC Cage - $198 - The cheapest of the non-ePhoto bunch. It’s just a cage with two 30cm 15mm rods included, so you have to kit the rest of it out, but it’s potentially the best deal, considering the price jump to the Wooden Camera or Tilta rigs.
- Gini Box Cage for BMPC - $269 - This is a slightly more well-known version of the CAME-06. I don’t know the difference in build quality, but you’re getting similar type kitting.
- Wooden Camera Base Kit - $939 - A well designed, modular kit. Expensive, but potentially worth it.
- Tilta TT-BMC-05 - $1570 - Not necessarily the most affordable, but very well designed. Expect to pay a hefty markup for their branded accessories. Note that this is an entire rig, rather than just a base kit, so the extra money is probably worth it, if you have it.
Glossy Screen. The screen is very reflective. I completely understand the virtual need for an EVF, otherwise you’re in daguerreotype shade cloth territory. Because it has SDI outputs, rather than HDMI, it’s probably a good idea to go with one of the SDI EVFs. Unfortunately, they’re not cheap. You more or less have the pick of these:
Cineroid EVF4MSS - $699 - The least expensive of the set.- Cineroid EVF4CSS - $599 - I realized that you can’t really use the EVF4MSS, despite its metal materials, because it only supports up to 1080i, whereas the BMPC4k requires 1080p.
- Cineroid EVF4RVW - $995 - Retina display version of the EVF4CSS. Higher resolution, higher price.
- Alphatron EVF-035W-3G - $1395 - The most expensive, but also most highly reviewed SDI EVF. Shane Hurlbut, A.S.C., endorsed this particular EVF for use with the BMPC body.
Otherwise, you’re in the market for both an EVF and an HDMI-to-SDI converter, which will tack on an addition few hundred dollars. The temporary budget solution, in my case, is to use a cloth until the EVF arrives …
Battery Life. The internal battery isn’t supposed to provide much shoot time ; virtually everyone using the camera has pointed out that it’s meant to be a sort of “buffer” between battery changes with an external battery. I bought a Switronix PB-70 for the body, which sports a RED-style V-mount, as well as a traditional 1/4”-20 mount. It can power the camera alone for at least four hours, and can additionally power other devices, like EVFs, HDMI-SDI converters, monitors, follow focus devices, et cetera, by the extensible power connectors. I have to buy an extra one, so I can have one charging and one plugged in, but it seems to be a decent solution.
Additionally, it helps to have the battery mounted on the camera assembly, otherwise it is moderately unweildy. The cheapest mounting solution for 15mm rods I found was the Ikan BMC-PBK-1-S mount, which has a small distribution center built into it. It’s slightly redundant, as the adapter that came with the PB-70 isn’t used, but for the money, it’s a good buy. It may make sense to buy the slightly more expensive Lanparte plate, which has a number of additional power outputs.
The Sun. Besides the glossy screen, the sun tends to blow out the fairly sensitive BMPC4k sensor. The solution is to use ND filters to reduce the amount of light coming into the sensor. You might be tempted to increase the f-stop, but you’ll also be increasing the depth of field to be more un-cinematic, so the ND filter is a must-have if you find yourself shooting in the direct sun, and don’t want to start using high shutter speeds. The downside is going to come in the “price” category; if you buy cheap ND filters, it will destroy the quality of the image, so you’re best off sticking with Tiffen or other brand-name high quality filters. They don’t come particularly cheap, however.
My recommendation to get started would be the Tiffen 77VND 77mm variable neutral density filter. It handles most of the reduction you’ll need, and at about $150, it’s far less expensive than a set of 4x4 filter glass.
Overall
I’m glad I didn’t wait for the Panasonic GH4. I know that’s going to come off as a little odd, but for the smaller sensor, M4/3 mount and its relatively insane crop factor, expensive add-on cinema kit, even odder form factor, H.264 codec, limited dynamic range, and rolling shutter – I feel that the BMPC4k body is going to do just fine. After all, no camera body makes you film better, or makes you a better cinematographer. All it can do is allow you the ability to increase your output quality – if you work for it.
NOTE: I haven’t posted any video clips yet due to the stabilization issues I had encountered using the handles alone. I may update the post to include some stills and short clips with the IS lens.

Lens Selection for Cinematography
The lens of your camera is arguably one of the most important parts of the camera ; it has the job of controlling light, adjusting focus (and focal length in variable focal length lenses), controlling depth-of-field through the aperture, and adding character to the shots you have lovingly framed. (It should be noted that the sensor of a digital video camera body is also very important, in terms of sensitivity, resolution, size, and other factors, but it is out of the scope of this article.)
There are quite a few factors to consider when choosing the lens you will use for a shot, as well as the lenses you will pack for a shoot. Do you pack one or two variable focal-length lenses, or do you pack a series of strategic length prime lenses? Do you stay with your native lens mount? Do you use vintage lenses? Do you need super-fast lenses?
As of the writing of this, I’ve been known to primarily use three or four prime lenses (24mm, 35mm, 50mm, and 85mm), while packing a 105mm or 135mm with a set of extension tubes for extreme macro usage. This setup will not work for everyone, as I will explain.
Lens Mount
There are several types of lens mounts, and depending on the type of camera body you use, one (or two) will be a “native” mount. For example, if you shoot using a Canon EOS camera (T3i, 7D, 5D mk3, C100, etc), you will most likely be using primarily EF mount lenses (and/or EF-S lenses if you aren’t shooting with a full-frame sensor). These native lenses have the advantage of having auto-focus / focus-confirmation electronics, as well as being able to mount with no additional hardware required. Auto-focus isn’t really an issue with cinematography, and focus-confirmation isn’t a huge advantage, especially if your camera has focus peaking – but these lenses were designed to work with your camera body.
Other lens mounts can be accommodated with adapter rings, which can usually be purchased for varying amounts from online retailers. I have a few M42 adapter rings for using old Pentax screw-mount lenses with the EF mount on my camera, and they work flawlessly for me. Some of the more expensive ones even have focus confirmation capabilities.
Photographers might give some pause to the idea of not having focus confirmation or auto focus, but cinematographers should be fine with it. Lens mount should only factor into your decision to use a lens by whether or not you have the appropriate adapter ring configuration to use that lens, in my opinion.
Prime or Variable Focal Length (Zoom)
A great deal of the answer to this question depends on the primary type of cinematography in which you tend to engage. A variable focal length lens is essentially a single lens which offers an “infinite number of focal lengths between its two bounds”, but there are other factors to be considered when using one. For example, many lower-cost variable focal length lenses will tend to have variable maximum apertures, depending on the target focal length.
If you’re engaged in documentary cinematography or non-planned shoots (such as many modern “web series” shoots), you may want to stick with the widest range of variable focal length lens you can accommodate. A 24-70mm lens will usually handle most shots which would be required by those mediums, and will mostly eliminate the hassle of changing lenses during critical (and possibly situationally-limited) shoot times.
A serious trade-off is that most variable focal length lenses are not “fast” (i.e. do not have a very low f-stop number for their maximum aperture size), and therefore tend to require more light. The faster lenses among that class tend to increase in cost greatly.
Prime lenses usually do one thing, and try to do it very well. They range down (and below) f/1.2, and are far more cost effective for a single focal length. If you have the time to change lenses in between shots, and tend away from smash zooms (which I tend to find are a bit over-used) and dolly/zoom combination shots, you might want to tend towards a collection of primes.
How fast is fast?
The majority of consumer-grade lenses tend to have smaller maximum aperture sizes than f/2.8, but there are a fair number of inexpensive primes which can be had with an f/2.8 maximum aperture size, and relatively inexpensive (compared to some) lenses can be had down to f/1.4 or so, depending on the relative concessions you’re willing to make regarding the lens quality, mount, manufacturer, et cetera.
As the aperture size increases, the depth of field decreases in size, but the amount of light hitting the sensor increases. Low light cinematography has historically relied on “fast” lenses rather than increased sensor sensitivity, primarily due to the increasing role that sensor “noise” plays at high ISO levels. This tradeoff means that you may have to decide whether depth of field or light sensitivity will be the primary determining factor in the maximum aperture rating of the lenses you’re using.
NOTE: Another thing to note is that lenses tend not to be their sharpest or best when fully open, so you may have to shoot slightly further shut than the maximum aperture rating.
Vintage Lenses
Some cinematographers (and photographers) will swear by vintage glass. Optics from lenses like old Carl Zeiss lenses are still amazing, and some of these lenses are sold for less than the comparable modern lenses for them. It can be a potentially expensive habit, however, since cinematographers have been driving up the cost of purchasing these lenses, as their lack of focus controls is far less bothersome than it would be to photographers.
If you can purchase vintage lenses (or happen upon a cache of them), it’s something to seriously consider. They have their own character, and when used thoughtfully, can add much to your footage.
Focal length
NOTE: If you’re going with variable focal length lenses exclusively, you may be able to safely skip this section. It deals mostly with the reasoning behind using certain focal length lenses.
Selection of focal length depends on a number of factors. Entire chapters, and even whole books have been written about selecting focal lengths for cinematography and photography. A great deal of it has to do with the type of shot you are working with, as well as the framing, etc. I’m going to hit some of the considerations, but I suggest further reading.
When considering focal lengths on cameras, I tend to consider them using the standard of a “full frame” sensor, since my camera has one. This means that the written focal length of a lens corresponds directly to the effective focal length of that lens. A larger “crop factor” (which is the case for smaller sensor sizes, like the Canon APS-C sensor and the Micro 4/3 sensors) means that a lens’s effective focal length is longer for those sensors. You can figure out the effective focal length by multiplying the stated focal length by the crop factor. For example, an APS-C crop factor is 1.5x, so a 35mm lens would have an effective focal length of 52.5mm, and a 50mm lens would have an effective focal length of 75mm.
“Wide angle” shots, which are usually used for establishing shots in cinema, generally tend to rely on very “wide” lenses, which are lenses with short focal lengths. As you move further away from 35mm effective focal length, the field of view present in your frame increases, which increases geometric distortion towards the edges of the frame. This has been referred to as a “fish eye” effect, when present in more than moderate amounts.
As an aside, I have seen cinematographers use extremely wide lenses (18mm and shorter) to shoot closeup shots of actors and actresses in tight quarters – and I must warn against it, unless you are acutely aware of the geometric distortion which you are introducing into the frame. This has very unpleasant effects on the faces of actors when used for close shots, and I know few actors who take kindly to being represented in a grossly distorted manner.
A 50mm effective focal length is essentially what your eye sees; at least, that’s the way I’ve come to think of it. It’s a very neutral lens to use for most shots. I recommend that this length be a standard part of any lens kit you’re putting together.
50mm lenses have been popular with the Canon DSLR cinematography crowd, primarily due to the inexpensive nature of the “nifty fifty”, a 50mm f/1.8 prime which clocks in at a little over 100 USD new. Its optics aren’t that fantastic, but its point of entry is so low in the cost department that many people will own one. If you do, consider buying an f/1.4 version of the same lens (or the f/1.2 L, if you’re successful, or have some sort of trust fund laying around), as the optical and build quality is far superior to the 50mm f/1.8 lens. It’s a “midway” focal length, but very usable for a variety of shots.
Greater than 50mm effective focal lengh lenses are considered “long” lenses. They tend to “compress” the space they capture, much as wide angle lenses tend to expand and distort it. One must be careful with using long lenses for handheld and steadicam work, as camera shake tends to be magnified with longer lenses.
Long lenses can also be used for closeup and extreme closeup shots by using “extension tubes” – what my brother used to refer to as “expensive air”. They increase the amount of light required, and are not as easy or compact as most macro lenses, but they’re relatively cheap, and cut down on the number of lenses you have to carry.
What the hell is a “bokeh”?
The term “bokeh” is a recent addition to the vocabulary of the photographer and cinematographer ; it simply refers to the blur produced by out of focus objects, particularly lights, by a lens. It is determined largely by the quality of the optics of the lens, as well as the number of blades in the lens’s aperture. Higher blade counts generally produce more “pleasing” bokeh, approaching the cinematic standard of almost circular light blur.
You haven’t told me which lenses!
This isn’t intended to dictate which lenses a cinematographer must carry, nor push certain choices over others, but merely to attempt to educate about sensible lens selection.
Consider buying a Pelican case, or other shock resistant case, for travelling to shoots. If you’re carrying a lot of glass, you can’t afford to deal with the downtime of a broken lens.
There are a huge number of lenses, both modern and “ancient”, and you can equip yourself with any variety of lenses, depending on your particular idiom and shooting style. Don’t fall into the trap of assuming that lens selection is unnecessary, or that everything should be shot with a single lens ; it’s just another aspect of cinematic creativity. Good luck!

Dynamic Range
As a photographer or cinematographer, I’m sure you’ve come into contact with limitations in dynamic range. I have run into limitations with dynamic range in both the visual and audio field, since anything that involves “real world” signals is going to potentially run up against the ability of the digital mediums on which we rely to properly store the entire gamut of available analog data that we are able to perceive with our eyes and ears. To combat the loss of data, computer scientists and electrical engineers developed the process of dynamic range compression, which is usually referred to as simple “compression”. This reduces the gamut of presented information to a digitally representable format. There is, however, something which is lost – and that is the original dynamic range ; the amount of variance between the strongest and weakest signal. In small doses, or when done with finesse, this provides the ability to produce better sounding and better looking content in the digital realm. When overused, we see results like the loudness war.
I like to explore the more figurative aspects of many technical concepts, to which most avid readers of my work would attest. In that vein of ideas, consider the derivative concept of dynamics as a function of cinematic tension/resolution and feeling.
Much like a written work, cinematic works generally tend to follow a “plot/story arc”, which have a number of basic stages, even if the presentation, order, and presence will vary between works. As cinematographers, one of our jobs is to attempt to portray the basic plot elements, character interactions, and other potentially metaphysical aspects of the story through the lensing, lighting, focal points, composition, and method of stabilization and capture we use. (I’m aware that there are other control points, but forgive me my omissions for the sake of some semblence of brevity.) For example, for a more “cinéma vérité” style for a combat or heavy action sequence, a filmmaker could choose to shoot with less stabilization, looser composition, and less staged lighting, which would present the audience with the perception that the scene is far closer to the work of a documentarian than a staged film scene. In Saving Private Ryan, for example, the battle scenes have a decreased exposure time, resulting in action appearing far more caustic and (what we believe is) more realistic. This allows the relative dynamics of the scenes in question to be raised to allow far more tension and action to be shown, through simple camera work.
The issue with techniques like this begin to manifest themselves when they begin to flatten the dynamic of a film work through rampant and flagrant overuse. At some point, cinematographers realized that they could shoot entire films with these techniques, ostensibly to raise those tension and action levels to that same high. By doing this, they have effectively flattened the dynamic range of their works, producing an effectively and uniformly “loud” work. The questions that you might be asking are “why is this a bad thing, and why should I care?”
We view things as deltas, or differences. We understand happiness because we understand sadness, heat because we experience cold, and comfort and companionship because we can contrast it with loneliness. If the range we are give to deal with is only the “best parts”, we begin to lose our ability to appreciate it, and all of those things which should have made it special and artistic become mere convention. Think about it – if everyone screamed everything at the same volume, rather than having varying levels of emphasis and volume, wouldn’t that screaming have lost its impact and importance?
Every technique that you have as a cinematographer or photographer is another potential tool in your figurative tool box; but just because you have them doesn’t mean that you have to use one particular one all the time. Handheld camerawork has its place, and even though modern technology has provided many methods of stabilizing camera and lens motion, from the steadicam to image stabilization/vibration reduction lens to three point shoulder rigs, we still find many cinematographers intentionally introducing shake into their footage. I wrote an entire essay on the importance of stabilization, so I won’t reiterate my grievances here.
It’s important to understand why you’re doing something rather than simply doing it for convenience or convention. If you’re using a wide open aperture, are you doing it because you’re having lighting issues, or simply because you think that everything should be shot with the thinnest DOF possible? Is there some sort of artistic reason why you chose to shoot with a 24mm vs a 35mm lens for a particular shot? Are you using a tripod-based shot rather than a steadicam for a reason? Asking questions and analyzing your own work, as well as the work of others, is key to artistic growth, as well as understanding how to use your skillset as a photographer or cinematographer.
I am, by no means, at the top of the skill grouping for photography or cinematography. Many of the entries I have authored here are products of making mistakes, and they are the attempt I am making to keep others from having to make some of the very same mistakes I have made. Even films and other work which we don’t particularly like as a whole may have a few setups or shots which provide food for thought. So, watch those films with a critical eye, and hopefully we can all expand our “toolboxes”, as well as learn how to use them in a more effective manner. Good luck!
Signal to Noise Ratio
To quote the venerable Wikipedia:
Signal-to-noise ratio (often abbreviated SNR or S/N) is a measure used in science and engineering that compares the level of a desired signal to the level of background noise.
This has a number of applications in engineering, but it also nicely encapsulates a basic truth of dealing with equipment, people, and works – there is always a certain amount of background noise. (For more information on the concept, check out this article.)
In an ideal world, all equipment would be flawless and noiseless, everyone would be wonderful at what they do, and all works would be exceptional (don’t mind the inherent logical issue in the statement “all works would be exceptional”; I was trying to make a point, so please forgive me my linguistic foibles). As it so happens, due to a fun little thing called the Dunning-Krueger Effect, we tend to assume that our works are better than they actual are, until we reach a particular skill level, at which point we start underestimating our own skill levels. Succinctly put, we’re all terrible at figuring out how good or bad we are at any particular skill.
This is a real pickle, especially when dealing with other people. With very few exceptions, we’re going to end up working with other people. This is more applicable in cinematography than in photography, since there are usually more people involved with a film production than with a still photo shoot (although I’m sure there are plenty of instances which would prove me wrong in that aspect).
I’m going to restrict my examples to cinematography projects, to keep this a bit more manageable and readable.
First, look at your potential crew. If you’re dealing with a low-budget indie shoot, which most of us are, you are either not paying your crew or are paying them very little money. You’ve already eliminated the possibility of a great number of highly experienced, educated, and trained people being involved, simply by eliminating the carrot of a serious payday. It could be additionally argued that those who do work for a living are not necessarily great at what they do, but that’s a little tangential to the core of the argument. Out of those people, you’re generally going to tend to see the talent curve follow the infamous standard/normal distribution curve. This means some will be utterly atrocious, some will be genius, and the vast majority will lie somewhere between those two points. The outliers and bounds will depend on the sample size, but the general concept tends to be the same, which is that most people are not going to possess genius-level skills in the vast majority of a sample set.
Second, look at your potential actors/on-screen talent. You’re in the same boat as you were with the crew – except that a single truly terrible actor will destroy the illusion you’re trying to create, so you have to hope that your lower bound is pretty high, otherwise your end product will most likely suffer. (It should also be said that a really great director has been known to coax amazing performances out of lackluster talent, but we can’t all be Stanley Kubrick, Darren Aronofsky, or P.T. Anderson…)
So, what are we to do? We need to start acknowledging that not everything we’re going to make is going to be the best thing ever. It’s an anathema to the general self-aggrandizing L.A. film culture, but we have to respect the normal distribution curve – most films will be mediocre, some will be agonizingly bad, and some will be amazing. The DKE means we’ll always think that they’re all amazingly wonderful, but we need to be far more critical of our own works ; at least, if we want to try to produce high-quality output.
We also need to understand that there’s a place for our hubris, as well as our humility. We cannot grow as filmmakers, photographers, artists, or as people, until we both appreciate the skill-set we have, while at the same time understanding the limits of what we have accomplished right now, and always striving to produce better, become better, and encourage better. We can’t all be the best, but we can all become better.